Basic DVD Menu Structure with DVD Architect
requires version 4 Vegas

This tutorial will show you how to set up a typical DVD Menu structure using DVD Architect. There is more than one way to do it, I find this one of the simpler methods.
The first screen shot shows the opening page in DVD Architect for a Menu Based DVD project. I changed the default title from Main Menu to My First DVD. To add/change text be sure that you have a check mark in front of Text Bar on the Menu under View. I also enabled the Grid system (Show Grid) under Options which allows you to more precisely position objects in the work space. You may also wish to change the grid spacing and grid color as I did so the thumbnails and text are easier to align.
When finished, a thumbnail of each video to be burned to the DVD will appear on the Main Menu page. Clicking on the thumbnail will take you to a separate sub menu page for each video added to the main page with the sub menu pages displaying thumbnails for each chapter you set. The Media Explorer, lower left bottom (base of arrow) is very similar to Windows' Explorer. Use it to locate files you wish to add to your project. This tutorial will show you how to make a DVD with one source video that has several chapter points. To add more videos to the DVD, just repeat the steps.
 Locate your first video in the explorer address bar. While holding
down your left mouse button simply drag a compliant video file to the work space
(blue) and drop it.
Locate your first video in the explorer address bar. While holding
down your left mouse button simply drag a compliant video file to the work space
(blue) and drop it.
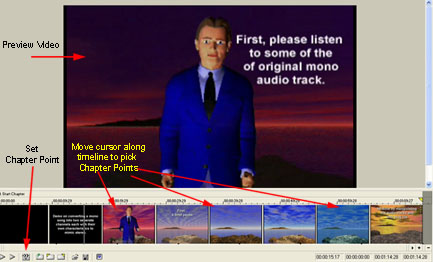
Now double click on the thumbnail you just dropped on the work space. A new window opens showing your video with the timeline below. The scrubber is different than in Vegas. All you need to do is position your cursor over the timeline, click and while holding down your left mouse drag back and forth which will advance the video. When you get to the place where you want to insert a chapter point, click the third icon from the left. You can enter descriptive text now to describe the chapter or do it later.
Add as many chapters as you like moving the cursor and clicking the insert chapter icon. If you don't get it exactly where you want you can can drag the chapter marker that travels above the timeline like in Vegas and move it back and forth along the timeline. If you already know the exact time value for a chapter you can jump to that position on the timeline by entering values in the first lower right bottom box provided. Once you are finished entering chapters click on the up arrow at the top of the workspace (not shown in illustration) which will return you to the main menu page.
 At this point you still only have one thumbnail on the main
menu page, first illustration above. Right click on this original thumbnail.
Select insert scene selection menu. A small window appears. Enter the
number of chapter thumbnails you want to appear per sub menu page. Click OK. A
new thumbnail appears with the caption Scene Selection. Delete the original
thumbnail. Reposition the new scene selection thumbnail in the workspace. You do
not need to be precise at this point.
At this point you still only have one thumbnail on the main
menu page, first illustration above. Right click on this original thumbnail.
Select insert scene selection menu. A small window appears. Enter the
number of chapter thumbnails you want to appear per sub menu page. Click OK. A
new thumbnail appears with the caption Scene Selection. Delete the original
thumbnail. Reposition the new scene selection thumbnail in the workspace. You do
not need to be precise at this point.
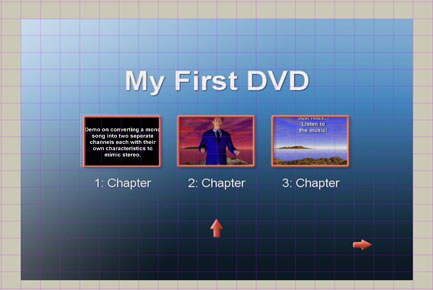
Click on PREVIEW at top of workspace. Main Menu appears similar to how it will appear on the DVD. Click on the thumbnail and/or use the built-in remote control for navigation.
Once you click on the thumbnail you'll see a new page with a new thumbnail for each chapter you inserted as shown as the left. Click on the text caption under each chapter thumbnail (then edit text) and enter whatever description you want. Note that two arrows are automatically added to the page. The up pointing arrow returns you to the main menu. The right arrow was added because then are more than three chapters, so the fourth chapter thumbnail will roll over to the next sub menu page. You can change the size and font family with the controls below the work space.
 One somewhat annoying feature I'm not that happy with is the size of
the thumbnails are by default changed relative to the number of chapters you put
on a sub menu page when using the automated scene selection menu. So the more
chapters you add, the smaller the thumbnails become. The size of the thumbnails
can be changed at the bottom of the work space by entering height and width
values. You can also enter X, Y values for positioning, but it is simpler to
just drag the thumbnails around. You can use the controls at the left of the
workspace to align the thumbnails and other objects so they align top edges,
left edges, center and so on. If you're use to desktop publishing applications
these controls work the same way. Obviously to align two or more objects you
first have to select them. To do so, click on an object, then while holding down
the Ctrl key select the next object. Selected objects can be nudged in tiny
steps by holding down the Ctrl key + the Alt key while using your directional
keyboard arrows.
One somewhat annoying feature I'm not that happy with is the size of
the thumbnails are by default changed relative to the number of chapters you put
on a sub menu page when using the automated scene selection menu. So the more
chapters you add, the smaller the thumbnails become. The size of the thumbnails
can be changed at the bottom of the work space by entering height and width
values. You can also enter X, Y values for positioning, but it is simpler to
just drag the thumbnails around. You can use the controls at the left of the
workspace to align the thumbnails and other objects so they align top edges,
left edges, center and so on. If you're use to desktop publishing applications
these controls work the same way. Obviously to align two or more objects you
first have to select them. To do so, click on an object, then while holding down
the Ctrl key select the next object. Selected objects can be nudged in tiny
steps by holding down the Ctrl key + the Alt key while using your directional
keyboard arrows.
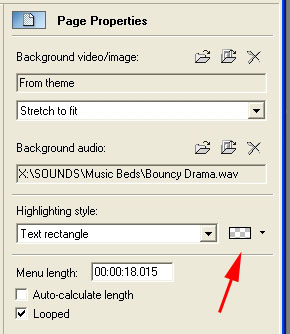
To the right of the workspace you'll find the Properties controls. One set the parameters is for the page, another does the same for Objects. The page properties controls which theme you use, background video/image, etc.. We're using the default since it is free form and empty. Click on the first folder icon to select any background image if you like, then in the second row select a song you would like to have play while the menu page is on screen.
 TIP: Use Vegas or another application to trim the song to the
length you wish your menu page to play before looping plus add a second or two
of silence. Import THIS file as your background music rather then using a whole
file which may waste a lot of disc space if a long song and you don't have the
background play that long. Highlighting Style refers to how the thumbnail and/or
the text below it will be highlighted when using your DVD remote control. The
arrow is pointing to the RGB color Picker. If you wish you can set custom colors
for the highlighting by moving the slider and entering custom RGB values. The
little checkerboard box reflects your changes. If you check looped, the
background music with play over and over.
TIP: Use Vegas or another application to trim the song to the
length you wish your menu page to play before looping plus add a second or two
of silence. Import THIS file as your background music rather then using a whole
file which may waste a lot of disc space if a long song and you don't have the
background play that long. Highlighting Style refers to how the thumbnail and/or
the text below it will be highlighted when using your DVD remote control. The
arrow is pointing to the RGB color Picker. If you wish you can set custom colors
for the highlighting by moving the slider and entering custom RGB values. The
little checkerboard box reflects your changes. If you check looped, the
background music with play over and over.
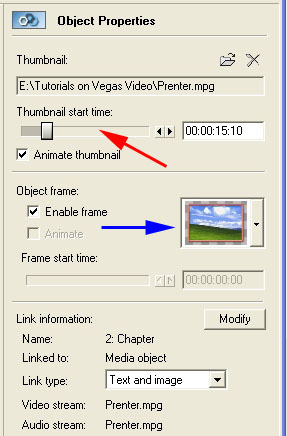
The Object Properties has several nice features. The red arrow points to the thumbnail start time slider. If you wish to animate a thumbnail slowly drag this slider back and forth to select the starting point that the thumbnail will animate from. This allows you to start anywhere in your video, you are not limited to having it play from the first frame. The thumbnail will play the length of time you set in Page Properties. So in this example it would start at 15:10 seconds into the video and play for 18:015 seconds, then loop. The Object Frame if enabled (blue arrow) allows you to select the type of frame if any, that the thumbnail is played in. There are many variations to choose from. There are other options you can set, but that's beyond the basics of this introductory tutorial.
This completes the process of building a simple DVD Menu structure. To add more videos, just repeat the steps. Drag a video to the main page, double click to add chapter points, Insert scene selection menu, give a description, realign the thumbnails and captions add a title, then set the page and object properties.