Preparing Images for Digital Presentations.
 Digital cameras today can produce images of high quality, almost
matching the quality of film. When taking photographs on a 6 megapixel digital
camera with the picture quality set to high, you will produce a picture that is
3008 X 2000 pixels allowing you to produce an excellent print up to 15.0” X 10.0”
(38 X 25cm).
Digital cameras today can produce images of high quality, almost
matching the quality of film. When taking photographs on a 6 megapixel digital
camera with the picture quality set to high, you will produce a picture that is
3008 X 2000 pixels allowing you to produce an excellent print up to 15.0” X 10.0”
(38 X 25cm).
Maintaining the highest quality image is very important when the output is a print on paper or photographic medium. However, “highest quality” also means large file sizes. Images transferred from the camera require a large amount of storage space either on the hard drive of your computer or on a portable storage device or medium such as a memory stick, CD, DVD.
Storage for students in a school situation can be an issue depending on the allocation of space on the school network.
Images that are only going to be viewed on a computer do not need to be of such high quality and therefore the file size can be reduced resulting in fewer issues with storage and faster loading of images in a presentation.
A computer screen’s resolution is commonly set to 1024 pixels X 768 pixels. Resizing your images from 3008 X 2000 pixels to 800 X 600 pixels will not only allow the whole image to be viewed on screen but also cut the file size considerably.
Screen resolution is also measured in pixels per inch (PPI). This is usually between 72 and 96 ppi. Saving your images at these lower resolutions will also save on file size but not affect screen image quality.
Saving images as JPEGS will also reduce the size of your file by compressing pixel data. When saving as a JPEG you will be prompted to set a level of compression. For digital presentations you should set a high level (8 – 10).
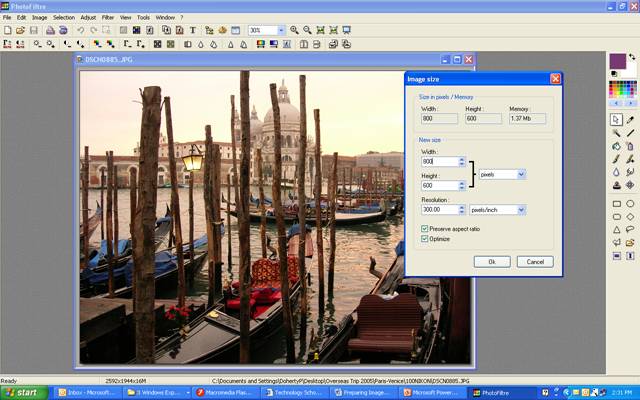
Image Resizing Using
Photofiltre
Images can be resized in any image editing
program. In Photofiltre, open your
image file and then click on “Image Size” In the drop down box change width to
800 pixels. If the original image is in a 3:4 format, clicking on “preserve aspect ratio” will
Batch
Processing:
If you have many images to resize, you can use a Batch Command to apply the changes to all of the images in a folder.
The menu item "Tools
/ Automate / Batch" makes it possible to carry out a succession of
operations
in an
"Files" tab
• Select the files source and the output destination (create a folder for the
resized images)
• Select the export format (JPEG)
• You can rename the files in sequence (optional) EG “excursion_001”
• A reduction of the number of colours and adjustment of image quality
(depending on image
output format) are also available
• By checking "Custom selection",
it's possible to carry out a manual selection of the images
to be treated
"Image"
tab
All the options are optional.
The option "Canvas size" is a little complex. It makes it possible to
add blank space around your
image by imposing a width and/or a height increase. The calculation of the
width and height will be
"Adjust" tab
Allows you to adjustment bases (brightness, contrast, saturation, gamma).
All the options are optional.
To convert a series of images into level of gray, adjust saturation at least
(-100%).
"Filter" tab
Allows to apply some preset filters.
All the options are optional.
"Transform" tab
Allows to carry out rotations and flips.
All the options are optional.
"Action" tab
Start the process and display report.
To cancel the process, press Escape key and wait until the program returns.
This action can take
one or several seconds depending on your computer's speed. In this tab, you can
also save your
parameters.