| Back to the main page | Back to the Effects page |
Reverb
What is Reverb ?
A Reverb simulates the component of sound that results from reflections from surrounding walls or objects. It is in effect a room simulator. Some peope think it's just a delay effect with some filters, but it's way more complex than that. Reverb effects (software plugins or external hardware units) provide an interface to their changable parameters that need some explaining. Let's look at a simple room first.
Basic Simulation of a Room
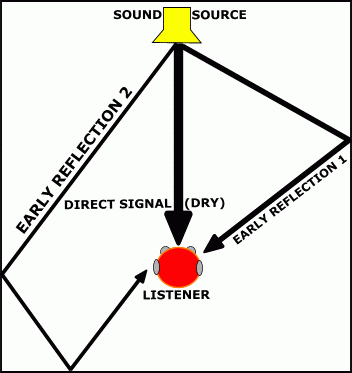
Our model is a simple room with four straight walls, a sound source and a listener. In Figure 1 the arrows stand for the path of travelling sound.
The listener hears the DIRECT signal first. The DIRECT signal is also referred to as the DRY part of the signal when using any effect. Most digital reverbs produce two parts: The Early Reflections and the Reverb component.

Figure 1 |
The first Early Reflection reaches the listener milliseconds after the direct signal does. The path of the Early Reflections is longer. The difference in time between the arrival of the direct signal and the first Early Reflections is measured in milliseconds. |

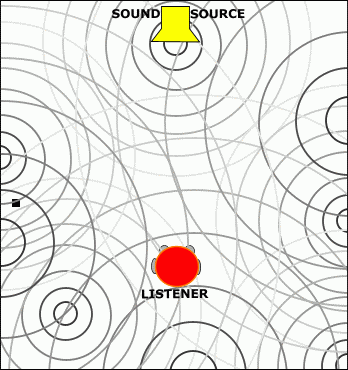
Figure 1 |
The sound reflects off the walls and objects in the room, and in time individual reflections disapear and the Reverb develops.
Predelay
Reverb Time This is usualy referred to as the Reverb Time. When anyone refers to the reverb time of a real room or that of a digital reverb, RT60 is what they're talking about. Most digital reverbs feature this as a parameter. |
Common parameters of a digital Reverb
| Early Reflections |
Usualy controlled via Room type and/or Room Size parameters. The EARLY REFLECTIONS enable the human brain to quickly identify the room size. They are therefore the most critical part of a reverb effect, if a room simluation is the goal. |
| Predelay |
Paramter Range : 0 to x milliseconds Time between Direct Signal and start of Reverb portion. The more space between you and walls or other reflective objects, the greater the Predelay. |
| Reverb Time |
Paramter Range : 0.1 to x.x seconds The greater the enclosed(!) volume of the space you're in, the longer the reverb time. Many reverb effects let you set different reverb times for different frequency bands. Most on PC and Mac architectures provide two bands. |
| Reverb Damping |
Usualy a Hishelf and/or a Lowshelf EQ with variable Frequency. These EQs are applied continously to an evolving reverb of a piece of audio. Over time, as the reverb fades, so do certain frequencies, either in the lower or higher frequency range. The more less-reflective surfaces the sound bounces around from, the more the reverb is dampened the higher frequencies. Freeverb features a Damping parameter that dampens the upper frequencies. |
| Reverb EQ |
Usualy a Hishelf and/or Lowshelf EQ with variable Frequency. These EQs are only applied to the output of the reverb or perhaps even just the reverb portion of the Reverb effect. Some reverbs have Hishelf and Lowshelf EQs for the Early Reflections as well. Freeverb has both a Hicut and Lowcut parameter. |
Here's a screenshot taken from the reverb plugin Renaissance Reverberator by Waves.

reproduced with permission
Here we have the Hishelf and Lowshelf EQs for Damping(left) and for the final output(right). The upper middle display depicts the Early Reflections placement and level, as well as the Reverb portion start and fading. Above this display is the Reverb Type selector. This changes the placement and level of the Early Reflections. The Size slider has influence on the Early Reflections as well.
Blank concrete will reflect sound quite well across the frequency spectrum. A large thick curtain or padded walls will reflect sound poorly. A large club filled with people sounds completly different from an empty one. People, comfy chairs, curtains, carpets, beds and many more objects reflect only part of the sound that hits them.
An example by the numbers
As an example I'd like to show you how to create a reverb for small club with a band.
Let's see what we have to do with parameters in the reverb fx in sample editors. First we determine some basics about the room we want to simulate.
Our room(the club) is about eight meters on all sides(for simplicity) and three meters high. The band will be playing no more than four meters away from us. The room volume will be about 200 cubic meters.
This means that the DIRECT SOUND will get to you within about 11 ms (milliseconds). This is the amount of time we'll need to take off the other values.
The first EARLY REFLECTIONS (off the left and right walls) travel around nine meters before reaching you, so they'll get to your ears about 15 ms later! (9 meters at 343 meters/sec -> 26 ms minus the 11 ms the DIRECT SOUND takes to travel to your ears).
I'm not taking the floor into account because of the obstacles, such as your own legs and a table, that prevent reflections of sound from the band from reaching you. It is also probable that your sitting close to a wall and EARLY REFLECTION time may drop considerably. Experiment and listen very carefully.
The reason I'm deducting 11 ms from the 26 ms is that in a sample editor we already have the DIRECT SOUND. In Cool Edit an EARLY REFLECTIONS parameter doesn't exist. In Soundforge however there are a few ER times to choose from. We choose whatever is closest to 15 ms. Freeverb unfortunatly does not have an Early Reflections feature.
Please note that the timing of the EARLY REFLECTIONS are defined by the rooms characteristics such as shape and size. The sound colour of the EARLY REFLECTIONS is defined by the surfaces in the room.These are parameters that are available to professional reverbs only(hard- or software), so don't worry about not finding that stuff in great detail in either Soundforge's, CoolEditPro's or plugins of other editors.
The PRE-DELAY and REVERB TIME depend on more than just room size. Wall and floor material, as well as anything else that reflects, disperses and dampens sound will influence the reverb in quite a few ways.
Our club has lots of wood on it's walls and floor and people are sitting at tables and the air's probably filled with a little smoke(except in California :).
The REVERB TIME, a parameter found in almost all plugins, should be set to no more than one second. In small, crowded rooms where little REVERB occurs it is quite important to set the EARLY REFLECTIONS right. Experiment with the reverb time keep it lower than 1.2 seconds and above 0.7 seconds. Freeverb puts all this information in to the SIZE parameter.
The PRE-DELAY can be set to 30 ms or more. Larger rooms will develop REVERB later since the reflecting sound will travel a while before the reflections become hard to identify but it also depends on the reflecting materials. Freeverb once again doesn't know any Predelays, but since you're reading this to learn how things work, it's still worth spelling out.
Both Cool Edit and Soundforge have parameters referring to the DENSITY of the REVERB part of the sound. Materials such as polished marble will reflect the sound very well and disperse the sound very little. Wood disperses the sound a lot and a carpet practically swallows a large chunk of it. For our Club we need to set the density high since our material disperses the sound a lot(humans,wood and obstacles). No parameter like that in Freeverb and yet it sounds great. It's easy to use as well, so I don't realy mind when using it.
Higher frequencies are swallowed a lot faster than low frequencies. Many reverb algorythems refer to this in some form or another. Cool Edit has the 'High Frequency Absorbtion Time' as a parameter for this. Sound Forge gives you a choice, whether to do this at all for both low and high frequencies and even lets you set them but doesn't provide any time parameters. Professional Reverb hardware such as Lexicon PCM 70,80&90 let you you control frequency and time of this, for low and high frequencies. Freeverb has the DAMPEN parameter for this.
This can effectivly add to room's liveliness. A room full of people will absorb high frequencies a lot faster than an empty room, in which only the materials would make the difference, so in Cool Edit we'll set the 'High Frequency Absorbtion Time' very low, since we're in a crowded club. For Soundforge activate the 'Attenuate high frequencies above' box and set the frequency parameter to around 2000-2500 Hz. Experiment a bit. The higher this frequeny and the longer the Absorbtion Time parameter in Cool Edit, the emptier and and colder your room will seem. In small rooms this can cause the room to sound very metallic. Sewer pipes and oil pipelines e.g.
The Reverb EQs are the final processing stage and can change the sound dramatically. These Hishelf and Lowshelf EQs are found in almost ANY Reverb plugin and hardware unit. Freeverb has both in form of Hipass and Lowpass filters. These are not EQs. The parameters change the target frequencies of the filters. Again, listen.
The last thing you have to do is set the balance between the WET signal and your original DRY signal. Here you can do as you please but remember that only very smoothed hard surfaces in big cavernous space create very loud reverbs. A church might do that if there aren't a big number of people and wooden benches in there, but a club doesn't :). Remember that in Audacity it is smarter to DUPLICATE the part you wish to add reverb to, and run the effect over that duplicate. The volume of that reverbed material is easier to control, so set the WET parameter in Freeverb to 0dB(->100%) and the DRY parameter to -endless(->0% left most slider position).
So when you create your next 'soon-to-be-the-hit' song or want to put things in perspective, be sure to check the possibilities of adding dimension and scope to your material through clever use of reverbs. Put your snare to the front, the piano a little to the back, and the sax just a little in front of the drums. Experiment. With these basics you'll be able to get better results in less time.
Btw, Snare always gets reverb. How much and what kind up to you, but it's a generaly good thing. It's also important to decide whether you're trying to simulate a real live band or doing a multitrack sound, which boasts all kinds of nice ideas, like doubling(another take of the same thing on top of the first take), extreme panning and in general NOT reality :).
More tips for using reverbs, including special effects can be found in the
Tips for Reverbs section.