Tutorial - III.Common Editing Tasks
Part 2 - Editing Vocal Tracks - Part 2
The Situation
|
You have: Vocals, Speech or Wallas (fx made with voices) You want to:
|
You can combine three ways of handling this:
|
When do I use what ?
|
The first option is a tool, but is rarely used by itself. In audio books, radio interviews and sometimes in dialog for a film, the vocal tracks will stand alone in many parts of your project. Therefore the second option is general practice. Many times, the third option is used as well(envelope tool). The holes you create with it are easier to control and change at later times, but still need to be filled up with replacement material. When using the envelope tool, replacement material is usualy overlayed by placing the filler material on another track right at the area in the timeline as the hole is. For this reason only silence unwanted audio if it's too obtrusive. Bad takes are of course not usable, so usualy you'll have to cut that stuff away. Just remember, that cut and delete(cut without copying to the clipboard) work like cutting tape away and sticking the remaining pieces together. If you're doing things that require critical timing, you need to keep this in mind. Use the Silence function instead. |
Continuous sound is the key in those cases and having the ambience, even if it's just a bit of quiet dark noise, drop away in many parts by silencing them isn't going to sound as good as keeping a steady sound texture. Therefore filling those holes with material on another track and fading the edges to make it all sound continuous is the preferred way to do it. There are situations, such as vocals in a song, that you'd like to sound as clean as possible. The best way is to have a very quiet recording room or location. The second best way is to use volume automation to get rid of any unwanted stuff. It allows you to change or take back what you did after you have made those changes to the volume curve with the envelope tool. With volume automation you can mute sections of the audio without actually making any edits to the audio data. |
The Three Options - a quick How To
Silencing
- Select an unwanted piece of audio.
- Listen to it a couple of times, adjust your selection if necessary, and listen again.
- Select Silence from the edit menu or hit CTRL+L on your keyboard.
- Fade the edges of the audio beyond your selection to smooth it out.
- Listen to it. If it doesn't sound good, hit Undo or press CTRL+Z on your keyboard, and try again fading those edges.
- Repeat this procedure for every part you don't want in your audio.
Substitution
- Silence all unwanted bits as described in the section above. Substitution expands and improves that option. Be sure to only silence the bits you don't want and don't forget to fade the edges around the silenced material. Then come back here.
- Now that you've silenced all unwanted, create a new audio track.
- Now find a piece of audio that'll work as a substitute for those deleted parts. This is usualy a piece of ambience somewhere else in the audio track. The speaker might have made a longer pause, so look in those areas first. Select that bit and duplicate it.
- Using the time shift tool, move the duplicated ambience directly beneath the first silenced part in your vocal track.
- Now select the entire track by clicking on track panel just beneath the Solo buttons, and duplicate it. Mute that new track. This will be our filler for the next gap in the original track.
- Turn your attention back to the first bit of ambience, that is now right underneath the bit that we silenced in our vocal track.
Using the Envelope Tool
- Switch to the envelope tool
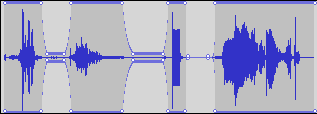
- Left-Click in to an area to create a new automation point or left-click on an existing automation point and drag to change the location of the point.
- The automation you have written remains bolted to the audio, so it will move along with the audio when you use the timeshift tool.
- An example:

Using the envelope tool - an example
| Back to the main page | Back to the Tutorial Page |